The Ultimate Guide to Building a WordPress Website Without Writing a Single Line of Code
For a long time, there was a massive wall between the people who had great ideas and the people who could actually build a website to share those ideas. If you wanted a professional web presence, you had two choices: spend months learning complex programming languages like HTML, CSS, PHP, and JavaScript, or spend thousands of dollars hiring a developer.
It is completely understandable if the thought of looking at a screen full of code makes your head spin. You are a business owner, an artist, a writer, or an entrepreneur—not a software engineer.
Fortunately, the internet has changed. Welcome to the “no-code” revolution.
Today, you can build a stunning, functional, and highly profitable website without ever looking at a single bracket of code. And the reigning champion of this no-code ecosystem is a platform you have definitely heard of: WordPress.
This comprehensive guide is designed for everyone—from absolute beginners to those who have tried and failed to build a site in the past. We are going to break down exactly how you can harness the power of WordPress using purely visual, drag-and-drop tools.
Grab a cup of coffee, and let’s build your website.
Chapter 1: The “No-Code” Revolution & The Evolution of WordPress
Before we dive into the “how,” it is important to understand the “what” and the “why.”
What Does “No-Code” Actually Mean?
“No-code” is exactly what it sounds like: a method of building software, applications, or websites using graphical user interfaces (GUIs) instead of traditional computer programming.
Instead of typing <h1 style="color:blue;">Welcome to my site</h1> to create a blue headline, you simply drag a “Heading” block onto your screen, type your text, and click a blue square in a color menu. The software writes the code for you in the background.
Reality Check: It is important to note that “no-code” does not mean “no effort” or “no learning curve.” You still have to learn how to use the interface, understand basic design principles, and figure out how different software tools connect. But the barrier to entry has been lowered from a mountain to a speed bump.
How WordPress Became a No-Code Powerhouse
WordPress started in 2003 as a simple blogging platform. Back then, modifying a theme required dipping your toes into PHP (a scripting language).
However, as WordPress grew to power over 43% of the entire internet, its community realized that to stay relevant, it needed to be accessible to everyone. Over the last decade, WordPress has undergone a massive transformation:
- The Rise of Page Builders: Third-party plugins like Elementor and Divi emerged, layering visual drag-and-drop interfaces over the core WordPress software.
- The Gutenberg Block Editor: WordPress eventually built its own native visual editor, treating paragraphs, images, and buttons as moveable “blocks.”
- Full Site Editing (FSE): Most recently, WordPress expanded blocks to the entire site—allowing you to visually design your headers, footers, and templates without code.
Today, WordPress is not just a platform; it is a blank canvas that you can paint on using powerful, intuitive tools.
Chapter 2: The Great Divide – WordPress.com vs. WordPress.org
If you are new to WordPress, this is the first trap you might fall into. There are actually two different versions of WordPress, and understanding the difference is crucial for your no-code journey.
| Feature | WordPress.com | WordPress.org (Self-Hosted) |
| What is it? | A hosted service (like Squarespace or Wix). | The free, open-source software you install anywhere. |
| Hosting | Provided for you. | You must purchase your own hosting. |
| Cost | Free basic plan, but expensive for full features. | Software is free; you pay for hosting (~$5-$15/month). |
| Customization | Limited on lower tiers. Cannot install custom plugins/themes unless you pay a premium. | 100% limitless. Install any theme, plugin, or page builder immediately. |
| Monetization | Restricted on lower tiers. | You keep 100% of your revenue. No restrictions. |
| Best For… | Hobbyists who want a simple blog fast. | Everyone else. Businesses, portfolios, stores. |
The Verdict for No-Code Creators
To get the true, powerful no-code experience where you can use the best drag-and-drop builders on the market, you must use WordPress.org.
When people talk about the limitless possibilities of WordPress, they are talking about the self-hosted (.org) version. It gives you the keys to the castle. The rest of this guide will focus entirely on self-hosted WordPress.
Chapter 3: Setting the Foundation – Domain and Hosting
Since we are using self-hosted WordPress, you need to provide the “land” and the “address” for your website. This is the only part of the process that feels a bit technical, but it is just like setting up an account for Netflix.
1. The Domain Name (Your Address)
Your domain name is what people type into their browser to find you (e.g., yourbusiness.com).
Tips for choosing a domain:
- Keep it short and memorable.
- Avoid numbers and hyphens if possible.
- Stick to
.comfor businesses, though.co,.io, or localized extensions (.fr,.co.uk) are also great.
2. Web Hosting (Your Land)
Web hosting is a physical computer server somewhere in the world that stores your website’s files and images, delivering them to visitors when they type in your domain.
For beginners, you want Managed WordPress Hosting or Shared Hosting with a one-click WordPress installer. You do not need to know how to set up databases or configure servers; the hosting company does it for you.
How to Install WordPress Without Code:
- Purchase a hosting plan.
- Log into your hosting dashboard.
- Look for a button that says “Install WordPress” or “Create Site.”
- Fill out your site title, username, and password.
- Click “Install.”
Within 60 seconds, the software is installed, and you can log into your new WordPress dashboard. You have successfully created a website foundation without seeing a single line of code.
Chapter 4: The Core of No-Code: Themes and Full Site Editing
Now that you are inside the WordPress dashboard, it is time to make it look good.
What is a Theme?
A theme is a collection of templates and stylesheets that dictate the overall look and feel of your website. It determines your typography, color palette, and layout structure.
Historically, if you wanted to change how your theme’s header looked, you had to hire a developer to rewrite the header.php file. Not anymore.
Enter Full Site Editing (FSE)
Modern WordPress utilizes Block Themes and Full Site Editing. This means that everything on your website is a “block.”
- A paragraph is a block.
- An image is a block.
- Your site logo is a block.
- Your navigation menu is a block.
How to use the Site Editor (No-Code):
- Go to Appearance > Editor in your WordPress dashboard.
- This opens a visual representation of your website.
- Want to change the header? Click on it. A menu will appear on the right side of your screen.
- From that menu, you can change the background color, adjust the spacing, or swap the logo just by moving sliders and clicking color swatches.
- Want to add a new section? Click the
+icon and drag a new block into your design.
This native WordPress editor (often called Gutenberg) is incredibly fast, lightweight, and perfect for building blogs, portfolios, and standard business websites.
Chapter 5: Supercharging with Page Builders
While the native WordPress Site Editor is excellent and improving daily, many no-code creators prefer dedicated Page Builders.
Page builders are plugins that completely replace the default WordPress editing experience with a highly advanced, ultra-flexible, drag-and-drop canvas. If you want pixel-perfect control over every animation, shadow, and layout without coding, page builders are your best friend.
The Heavyweights of No-Code Page Builders
Here are the most popular options available today:
1. Elementor
Elementor is arguably the most popular page builder in the world. It features a live, front-end editor. This means you see exactly what your visitors will see as you are building it.
- How it works: You have a panel of “widgets” (buttons, images, testimonials, maps) on the left. You drag them onto the page on the right. You can then click on any widget to change its style, colors, and margins.
- Best feature: The massive ecosystem. Because it is so popular, there are thousands of add-ons and pre-made templates available for Elementor.
2. Divi (by Elegant Themes)
Divi is both a theme and a page builder. It is renowned for its sleek interface and powerful design options.
- How it works: Divi is heavily focused on visual editing. You hover over elements on the page, and little floating menus appear allowing you to tweak settings, add shadows, or apply complex animations.
- Best feature: A massive library of over 2,000 pre-made website layouts. You can literally click one button to import a fully designed website for a restaurant, agency, or gym, and then just change the text to your own.
3. Beaver Builder
Beaver Builder is loved by agencies and professionals because it is incredibly stable and generates very clean code in the background (which is good for website speed).
- How it works: Similar to Elementor, but with a slightly more utilitarian interface. It focuses on reliability and ease of use.
- Best feature: It rarely breaks. If you update your site, you can trust that your Beaver Builder layouts will remain intact.
How to Choose?
If you are starting out and want a massive community for support and tutorials, start with the free version of Elementor. If you want a complete, all-in-one package with gorgeous pre-made designs, look into Divi.
Chapter 6: Plugins – The “App Store” of WordPress
Your smartphone is useful out of the box, but it becomes powerful when you download apps. WordPress is exactly the same. Plugins are packages of software you add to your WordPress site to give it new features, all without writing code.
There are over 50,000 free plugins in the WordPress repository. Here is how you solve complex technical problems visually using plugins:
1. E-Commerce (Selling Things)
- The Problem: You want to sell products, process credit cards, and manage shipping. Coding a checkout system is incredibly difficult and a massive security risk.
- The No-Code Solution: Install WooCommerce. It is a free plugin that instantly turns your site into a fully functional online store. It provides visual dashboards to add products, set prices, and connect to payment gateways like Stripe or PayPal with a few clicks.
2. Search Engine Optimization (SEO)
- The Problem: You need Google to find your website, which usually requires adding specific “meta tags” to the
<head>code of your website. - The No-Code Solution: Install Yoast SEO or Rank Math. These plugins add a simple box at the bottom of your pages where you can type in your desired title and description. They also give you a visual “score” (red, yellow, green) telling you how well your page is optimized.
3. Contact Forms
- The Problem: You want visitors to send you messages without exposing your email address to spam bots.
- The No-Code Solution: Install WPForms or Fluent Forms. These provide a drag-and-drop form builder. Drag a “Name” field, an “Email” field, and a “Message” field into the builder, click save, and drop the form onto your contact page.
4. Security and Backups
- The Problem: Websites get hacked, and servers occasionally crash.
- The No-Code Solution: Install Wordfence for a visual firewall that blocks malicious traffic automatically. Install UpdraftPlus to schedule automatic backups of your website to your Google Drive or Dropbox with one click.
Chapter 7: Step-by-Step: Building Your First Page Without Code
Let’s put theory into practice. Here is a brief walkthrough of how you would build a standard “Homepage” using a modern visual builder (like the native WordPress block editor or Elementor).
Step 1: Set Up the Page
Go to Pages > Add New. Give your page a title, like “Home.”
Step 2: The “Hero” Section
The hero section is the large area at the top of a modern website.
- Click the
+to add a Cover block (or a Section in a page builder). - Upload a background image from your computer.
- Use the sidebar settings to add a dark overlay so your text will be readable.
- Inside that block, add a Heading block. Type: “Welcome to My Business.”
- Under the heading, add a Paragraph block. Type a brief description of what you do.
- Under the paragraph, add a Button block. Type “Contact Us” and link it to your contact page. Use the visual settings to make the button your brand’s color.
Step 3: The “Services” Section
Below the hero section, you want to list three services.
- Add a Columns block and select a 3-column layout.
- In the first column, add an Image block (upload an icon), a Heading block (Service 1), and a Paragraph block.
- Instead of doing this two more times, simply click on the column you just built, click Duplicate, and move it to the other columns. Change the text and images.
Step 4: Publish
Click the blue Publish button in the top right corner.
You have just built a responsive, modern web page structure in about five minutes. No HTML. No CSS. Just clicking, dragging, and typing.
Chapter 8: The Golden Rules of No-Code Design
Just because you can build anything doesn’t mean you should build a cluttered mess. When you are using visual tools, it is easy to get carried away with animations, wild colors, and too many fonts.
To make your no-code site look like you paid a professional $5,000, follow these visual design rules:
1. Embrace White Space
Also known as negative space. Don’t cram your text and images together. Use the “Margin” and “Padding” settings in your page builder to give your elements room to breathe. A clean layout looks instantly more professional.
2. Limit Your Fonts and Colors
- Fonts: Choose a maximum of two fonts. One for your headings (maybe something bold or stylized) and one for your body text (something highly readable like Open Sans, Inter, or Roboto).
- Colors: Pick one primary brand color, one secondary color, and stick to dark grays for text. Use your primary color exclusively for things you want people to click (like buttons and links).
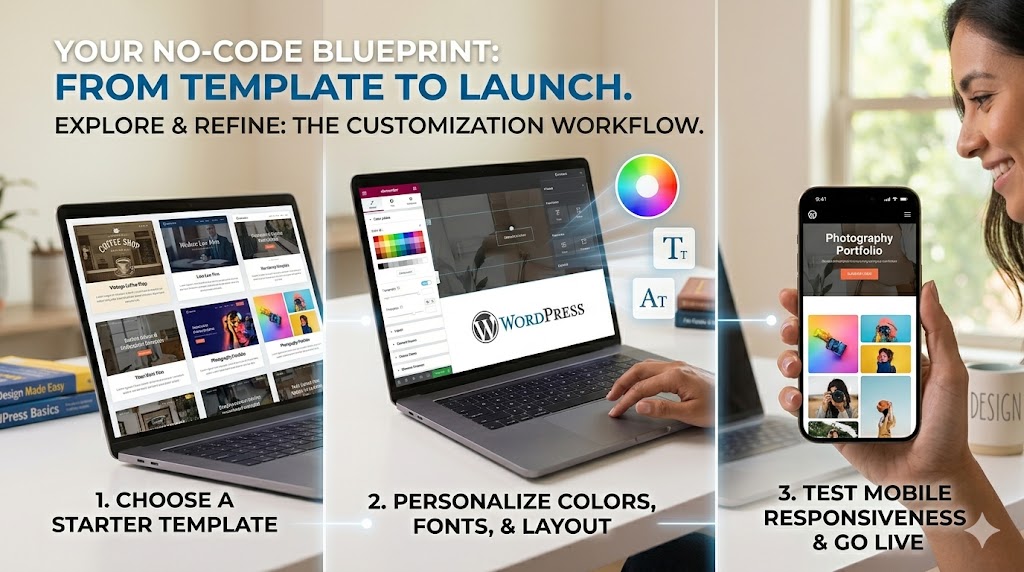
3. Design for Mobile First
Over 50% of your website traffic will come from smartphones. Every major no-code builder in WordPress has a “Responsive Mode.”
- Always click the little mobile phone icon in your editor to see how your design stacks on a small screen.
- You may need to visually adjust the text size to be smaller on mobile, or reverse the order of columns so they stack correctly.
Chapter 9: Maintaining Your No-Code Empire
One misconception about websites is that you build them and forget them. WordPress is living software, and maintaining it is crucial. Fortunately, maintenance is also a no-code process.
Software Updates
WordPress core, your theme, and your plugins will frequently release updates. These updates contain new features and, more importantly, security patches.
- How to do it: Log into your dashboard. If you see a red notification circle next to “Updates,” click it. Select all the outdated plugins and click “Update.” That’s it. You can even toggle on “Enable Auto-Updates” for a completely hands-off experience.
Managing Media
As you drag and drop images into your site, they are stored in the WordPress Media Library.
- Pro-Tip: Never upload a 5-megabyte image straight from your camera. It will make your website incredibly slow. Use a free online tool to compress the image, or install a no-code image optimization plugin like Smush, which automatically reduces file sizes in the background as you upload them.
Conclusion: You Have the Power
The days of web development being an exclusive club for programmers are officially over. The “no-code” movement, championed by WordPress, has democratized the internet.
By understanding the difference between hosting and domains, choosing the right visual theme or page builder, and utilizing plugins to add complex functionality, you have everything you need to build a digital presence.
It will take a little patience to learn where all the buttons and settings are located in your chosen visual builder. You might spend an hour figuring out how to get two columns to align perfectly. But you will be doing it visually, logically, and entirely on your own terms.
You don’t need code. You just need an idea, a willingness to click around, and the incredible power of WordPress. Start building.